How to build a chimney
How to Build a Chimney: A Complete Guide
Building a chimney is an essential project for many homeowners who want to enjoy a cozy fireplace or ensure proper ventilation for their heating system. A well-constructed chimney not only adds aesthetic value to your home but also contributes significantly to the efficiency and safety of your heating systems. In this article, we will provide a comprehensive guide on how to build a chimney, covering everything from materials and planning to construction techniques and maintenance.
Understanding the Basics of Chimney Construction
Before diving into the construction process, it’s important to understand the basic components of a chimney and the principles involved in building one. A chimney typically consists of the following parts:
- Flue: The duct through which smoke and gases exit the house.
- Chimney liner: A protective layer installed inside the flue to prevent heat transfer and protect the structure.
- Chimney cap: A covering at the top of the chimney that keeps out rain, debris, and animals.
- Chimney crown: The top surface that directs water away from the structure.
- Stack: The vertical part of the chimney that extends above the roofline.
Knowing these components will help you understand how to build a chimney effectively and ensure it operates safely.
Planning Your Chimney Construction
Effective planning is crucial before beginning construction. Here are the steps you'll want to consider when planning your chimney:
- Determine the chimney location: Consider local building codes and avoid spots near electrical or gas lines.
- Select materials: Materials commonly used for chimneys include brick, stone, concrete, and metal. Each has its advantages and disadvantages.
- Consult local building codes: Ensure you follow regional regulations and obtain necessary permits.
- Plan for clearances: Make sure your chimney meets clearance requirements from combustible materials.
- Design your chimney: Decide on a height, width, and overall aesthetic to match your home.
Materials Needed for Your Chimney
Choosing the right materials is pivotal in ensuring the durability and functionality of your chimney. Below is a list of materials you may need:
- Firebricks or masonry bricks
- Mortar mix
- Chimney liner (clay or metal)
- Chimney cap
- Insulation (if needed)
While the primary objective is to build a functional chimney, considering its appearance and how it integrates with your home’s architectural style is equally important.
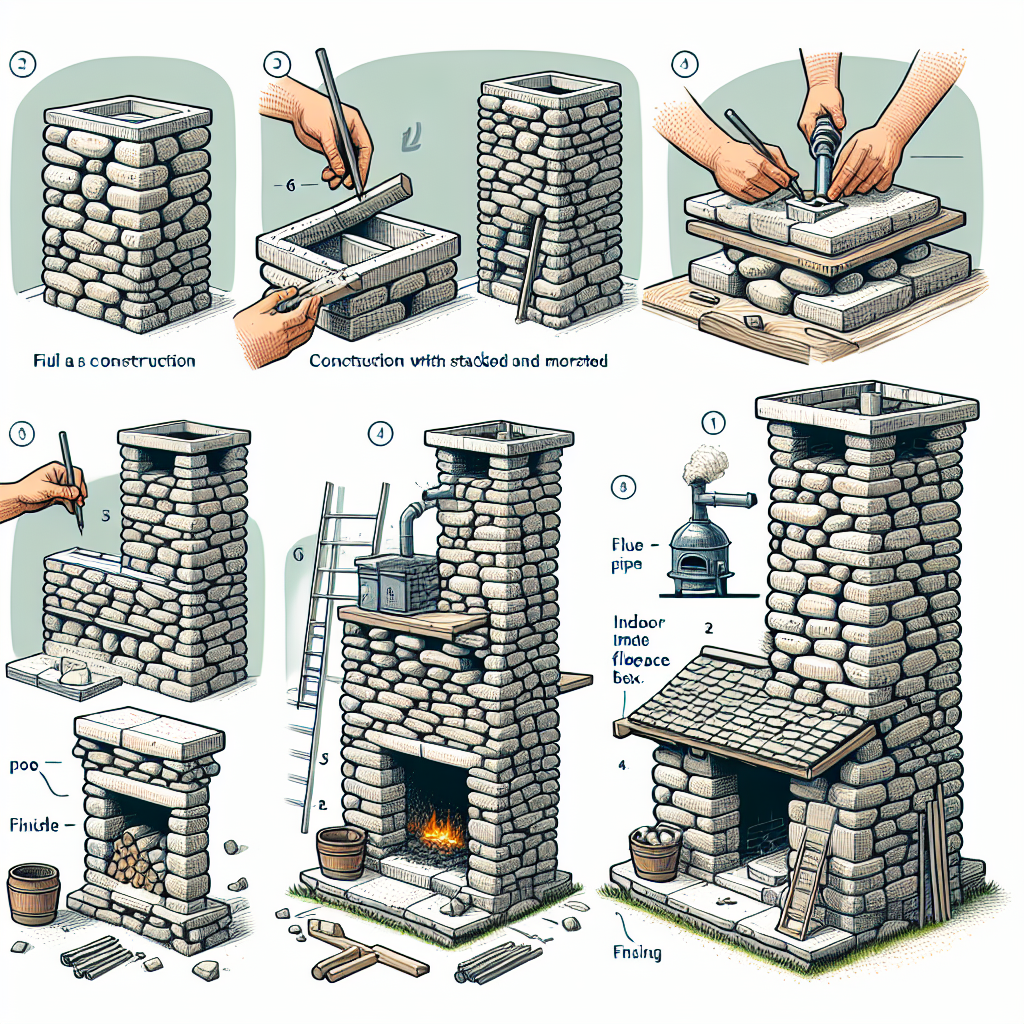
Step-by-Step Guide on How to Build a Chimney
Now that you've planned and gathered materials, let’s delve into the construction process. Here’s a step-by-step guide to building your chimney:
Step 1: Prepare the Foundation
Your chimney needs a sturdy foundation to support its weight and ensure stability. Follow these steps:
- Excavate the area: Dig a hole that is about 12 inches deep and larger than the chimney’s base.
- Pour concrete: Mix and pour concrete into the hole, leveling it to create a solid base.
Step 2: Lay the Brickwork
Once the foundation has set, it's time to start laying bricks.
- Start from the bottom: Begin laying bricks in a staggered pattern, using mortar to bond them.
- Build up: Continue adding rows of bricks while ensuring they are level and plumb.
- Create the flue: As you build up, leave space for a flue. Ensure it is centered within the chimney.
Step 3: Insert the Chimney Liner
After reaching the required height, insert the chimney liner. This step involves the following:
- Measure the flue: Ensure the liner fits perfectly within the flue you created.
- Install the liner: Follow the manufacturer’s instructions for installing the liner securely.
Step 4: Create the Chimney Cap
The chimney cap protects the flue from water, debris, and animals. Here’s how to create one:
- Cut your material: If using stone or concrete, cut it to size to cover the chimney opening.
- Install with angled edges: This ensures proper drainage and directs water away.
Step 5: Install the Chimney Crown
The chimney crown is essential for water protection. Follow these procedures:
- Mix mortar: Prepare a concrete or mortar mix suitable for outdoor use.
- Shape the crown: Form the crown over the top of your chimney using a slight slope.
Step 6: Finishing Touches
After the main structure is complete, it's important to add finishing touches:
- Seal gaps: Apply a waterproof sealant around the chimney to prevent leaks.
- Inspect your work: Ensure everything is secure and meets safety codes.
Safety Considerations
When learning how to build a chimney, safety should always be a priority. Here are some vital safety tips to ensure a successful construction:
- Wear protective gear, including gloves and safety goggles.
- Use scaffolding or ladders safely and comply with the manufacturer’s instructions.
- Be aware of your surroundings, especially power lines and other hazards.
Maintaining Your Chimney
Once your chimney is built, regular maintenance is essential to ensure it remains safe and functional:
- Schedule annual inspections with a certified chimney sweep.
- Inspect for cracks, loose bricks, or buildup of creosote.
- Clean the flue and chimney cap regularly to avoid blockages.
Conclusion
Building a chimney requires careful planning, the right materials, and skilled execution. Following this guide will help you understand how to create a chimney that is both functional and aesthetically pleasing. Remember that proper maintenance is crucial for its longevity and safety. If you're unsure about any step in the process, consider consulting with a professional chimney builder or inspector to ensure the best results for your home. Now that you're equipped with this knowledge, you’re ready to embark on your chimney-building project!
By Guest, Published on September 15th, 2024