How to build a deck off a house
Building a Deck Off Your House: A Comprehensive Guide
Building a deck off your house is an exciting and rewarding endeavor that enhances your outdoor living space and increases the value of your property. A well-constructed deck provides a perfect venue for relaxing with family and friends, hosting barbecues, or simply enjoying the outdoors. In this guide, we will walk you through everything you need to know about planning, designing, and constructing your deck.
Understanding the Basics of Deck Construction
Before you dive into construction, it's crucial to understand the basic components of a deck. Here are the primary elements:
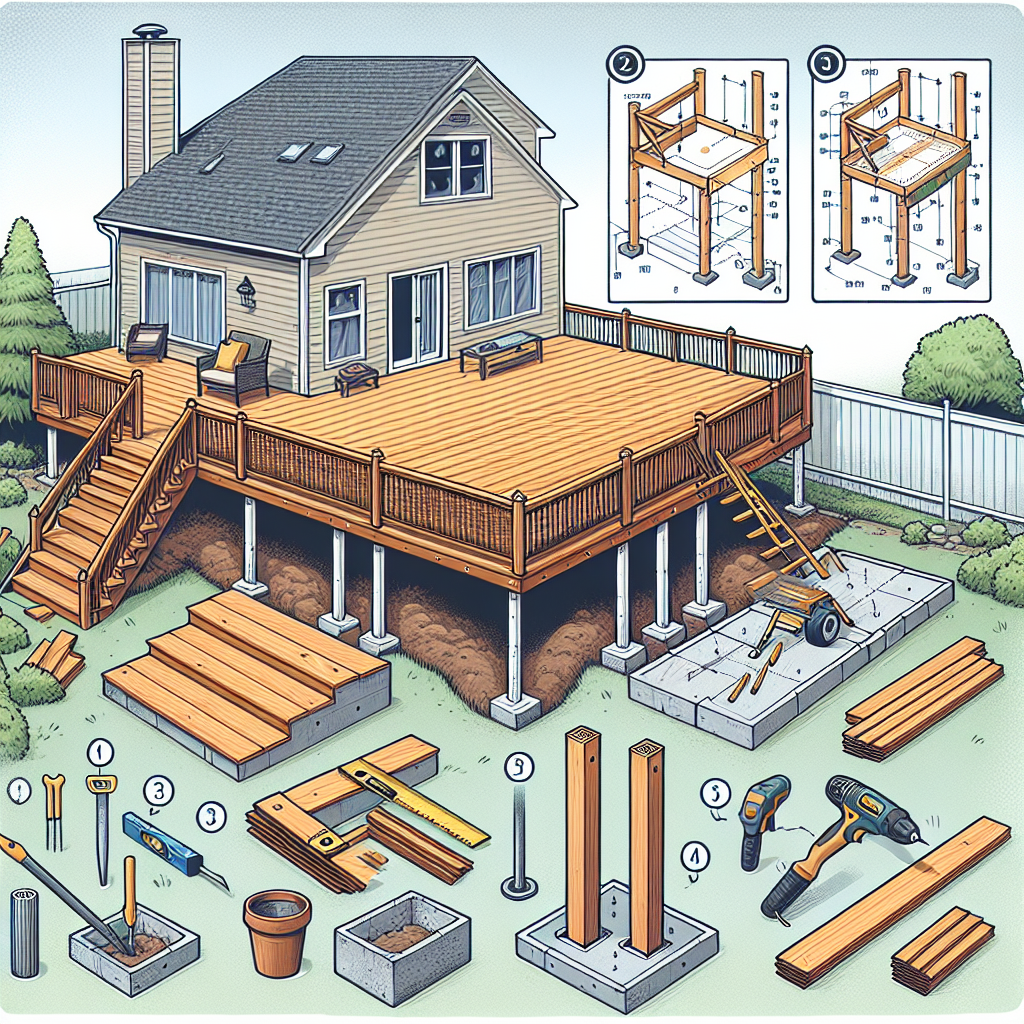
- Framing: The structural skeleton of the deck, usually built from treated lumber or steel.
- Decking: The surface of the deck where you walk, typically made from wood or composite materials.
- Railings: The safety barrier around the deck, which can also add aesthetic value.
- Posts and Beams: These support the framing and are essential for stability.
Planning Your Deck
Before jumping into the construction phase, proper planning is essential for the success of your deck project.
Step 1: Determine the Purpose
Consider how you plan to use the deck. This will influence its size, shape, and features. Here are some common purposes for a deck:
- Outdoor dining space
- Relaxation area with lounge chairs
- Space for a hot tub
- Outdoor kitchen or barbecue area
Step 2: Establish a Budget
The cost of building a deck can vary significantly based on materials, size, and labor. It's crucial to set a budget early on and stick to it. Consider the following expenses:
- Materials (lumber, screws, railing systems)
- Tools (saws, drills, levels)
- Permits and inspections
- Labor costs if hiring professionals
Step 3: Research Local Building Codes
Before beginning your project, it is necessary to understand the local building codes that apply to deck construction in your area. Check if a permit is required and what specifications must be met. Common regulations may include guidelines for:
- Height restrictions
- Setback requirements from property lines
- Rail height
- Footing specifics
Step 4: Design Your Deck
A well-thought-out design is crucial for both aesthetics and functionality of your deck. Here are some factors to consider:
- Shape and Size: Will it be a rectangular, square, or custom shape?
- Materials: Choose between wood, composite, or PVC decking based on your budget and maintenance preference.
- Features: Include built-in seating, planters, or shade structures to enhance usability.
Gathering Materials and Tools
After finalizing your plan, it's time to gather your materials and tools. Here’s a basic list to get you started:
Essential Materials
- Treated lumber (for framing)
- Decking boards (wood or composite)
- Joist hangers
- Post anchors
- Screws and fasteners
- Railings and posts
- Concrete (for footings)
Necessary Tools
- Power saw (circular or miter saw)
- Drill
- Level
- Tape measure
- Hammer
- Safety gear (goggles, gloves)
Building Your Deck
Now that you have your design, budget, materials, and tools, you're ready to begin construction. Here’s a step-by-step approach to building a deck off your house:
Step 1: Mark the Deck Area
Use stakes and string to outline the perimeter of your deck. Ensure it aligns with your existing structures and fits within any local regulations.
Step 2: Install Footings
Footings provide a solid foundation for your deck. Dig holes according to the size and depth specified in your local building codes, typically below the frost line in your area.
Pour concrete into the holes and insert post anchors while the concrete is still wet. Allow the footings to cure as per the instructions on your concrete mix.
Step 3: Construct the Frame
Once the footings have cured, you can begin framing the deck:
- Attach the ledger board to the house, ensuring it is level.
- Install posts in the anchors and secure them using brackets.
- Attach beams to the tops of the posts to create the frame.
- Add joists between the beams at appropriate intervals, typically 16 inches apart.
Step 4: Add Decking
With the frame complete, it’s time to install the decking boards. Start from one edge and work your way across, leaving small gaps between boards for drainage.
Step 5: Install Railings
After the decking is in place, install the railings. Ensure that the rails meet height requirements and are securely fastened to the posts.
Step 6: Finishing Touches
Once the main structure is complete, consider adding some finishing touches:
- Stain or seal the deck for protection and aesthetic enhancement.
- Add furniture and decorations to create an inviting atmosphere.
- Consider installing outdoor lighting for evening enjoyment.
Maintenance Tips for Your New Deck
After investing time and resources into your deck, it’s essential to maintain it properly to ensure its longevity. Here are some maintenance tips:
Regular Cleaning
Clean your deck regularly to prevent the buildup of dirt, mold, and mildew. Use a soft broom or power washer with mild detergent for best results.
Inspection
Periodically inspect your deck for any signs of damage such as loose boards, rusted screws, or rotting wood. Addressing these issues promptly will prevent larger problems.
Resealing and Staining
If you used wood for your decking, plan to reseal and stain it every few years to protect it from moisture and UV damage.
Conclusion
Building a deck off your house can significantly enhance your outdoor experience. By following this comprehensive guide and taking the time to plan and execute your project properly, you’ll have a beautiful addition to your home that will provide years of enjoyment. From determining your deck's purpose to gathering materials and maintaining it, each step is crucial in ensuring your deck is a lasting investment. Happy building!
By Guest, Published on October 7th, 2024