How to make a bench seat
How to Create Your Own Bench Seat: A Comprehensive Guide
Building a bench seat can be a rewarding project that adds both functionality and style to your space. Whether you need extra seating in your living room, a cozy spot in your garden, or a bench for your entryway, making your own can be a personal and fulfilling endeavor. In this guide, we will walk you through the steps to create a bench seat, including the materials you need, the tools required, and tips for design and finishing touches.
Why Build Your Own Bench Seat?
Creating a bench seat from scratch allows you to customize it to fit your specific needs and style. Here are a few reasons why you might want to consider this project:
- Customization: You can choose the materials, style, and dimensions that best fit your home or outdoor area.
- Cost-Effectiveness: Building your own bench can save you money compared to purchasing a pre-made piece.
- Skill Development: This project can help you develop carpentry skills and gain confidence in your DIY abilities.
- Personal Touch: A handmade bench seat adds a personal touch to your decor, making it truly unique.
Materials You’ll Need
Before you start, gather all the necessary materials for your bench seat project. Here’s a list of what you’ll need:
- Wood planks (for the seat, legs, and support)
- Screws or nails
- Wood glue
- Sandpaper or a power sander
- Paint or wood stain
- Primer (if painting)
- Sealer (for outdoor benches)
Tools Required
Having the right tools on hand will make your project smoother and safer. Here’s a checklist of tools you may need:
- Measuring tape
- Saw (circular saw or hand saw)
- Drill
- Screwdriver
- Clamps
- Paintbrush or roller
- Safety goggles
- Work gloves
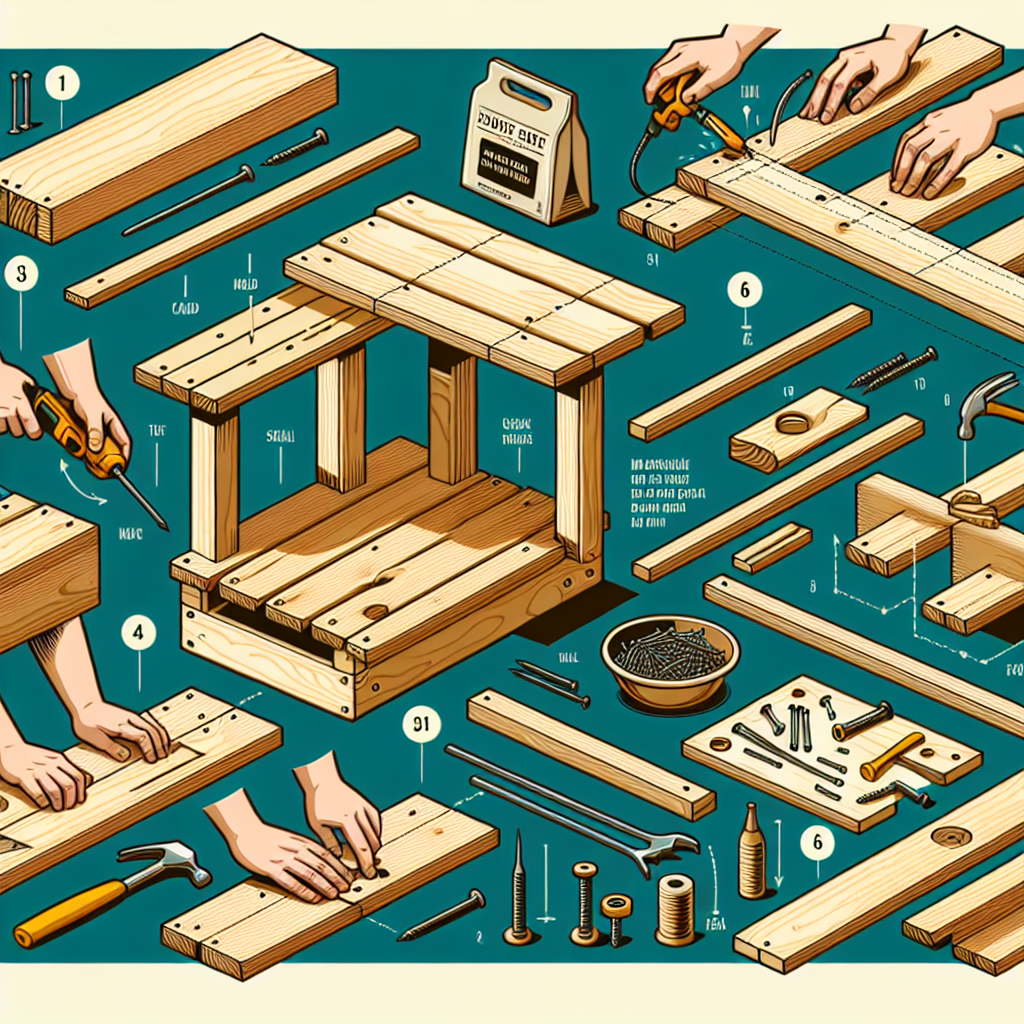
Step-by-Step Instructions for Building Your Bench Seat
Now that you have your materials and tools ready, let’s dive into the step-by-step process on how to make a bench seat.
1. Design Your Bench Seat
The first step is to decide on the design of your bench. Consider the following:
- Size: Measure the space where you want to place the bench to determine appropriate dimensions.
- Style: Choose a style that complements your existing decor, whether that’s modern, rustic, or traditional.
- Functionality: Think about how you will use the bench. Will it have storage underneath or be more decorative?
2. Prepare the Wood
Once you have your design, it’s time to cut the wood. Follow these tips:
- Measure and mark your wood planks according to your design.
- Use a saw to cut the wood to the desired lengths.
- Sand all the edges and surfaces to remove splinters and ensure a smooth finish.
3. Assemble the Frame
With your wood planks cut and sanded, you can start assembling the frame:
- Lay out the base frame on a flat surface using the wood pieces for the legs and supports.
- Attach the pieces together using wood glue, screws, or nails. Make sure everything is square and level.
- Secure the corners and ensure the frame is sturdy.
4. Add the Seat
After the frame is assembled, it’s time to attach the seat:
- Lay the seat plank across the top of the frame.
- Fix it into place using wood screws, ensuring it is securely attached.
5. Finishing Touches
Now that your bench structure is complete, it’s time to add the finishing touches:
- Painting or Staining: Choose a paint or stain that suits your style. Apply primer if you are painting.
- Sealing (for outdoor use): Apply an outdoor wood sealer to protect your bench from the elements.
- Adding Cushions: For comfort, consider adding cushions or pillows that match your decor.
6. Place Your Bench in the Desired Location
Once the paint or stain is completely dry, carefully move your bench to its designated spot. Depending on the size, you may need assistance for this step.
Maintenance Tips for Your Bench Seat
To keep your bench seat looking great and lasting longer, regular maintenance is key. Here’s how:
- Clean Regularly: Dust the bench frequently and clean spills immediately to prevent damage.
- Inspect for Damage: Regularly check for loose screws, splinters, or signs of wear.
- Reapply Sealer or Paint: If your bench is outdoors, reapply sealers or paint every few years for protection.
Final Thoughts
Building your own bench seat can be a fun and satisfying project that enhances your space while expressing your creativity. By following this guide, you can confidently tackle your DIY project and create a beautiful piece of furniture that meets your needs. Enjoy your new bench seat and the proud accomplishment of having made it yourself!
“The best part of building something yourself is the sense of pride and ownership you feel every time you use it.”
With a little planning, the right tools, and a dash of creativity, your dream bench seat is just a project away! Are you ready to get started?
By Guest, Published on August 15th, 2024