How to make a bookshelf
Creating Your Own Bookshelf: A Step-by-Step Guide
Building a bookshelf can be a fulfilling project that not only showcases your personal style but also provides practical storage for your cherished books. Whether you are an avid reader or simply need a stylish way to organize your living space, knowing how to make a bookshelf can transform your home. This article will guide you through the essential steps, materials, and tips to create a bespoke bookshelf that fits your needs perfectly.
Choosing the Right Design
Before diving into the construction of your bookshelf, it's essential to determine the style and design that will best suit your space. There are numerous designs to consider, which can affect the functionality and aesthetic of your bookshelf.
- Ladder Bookshelf: A modern, minimalist design that leans against the wall.
- Wall-mounted Shelves: Great for saving floor space and adding a floating appearance.
- Traditional Bookshelf: Freestanding and often includes multiple shelves and decorative elements.
- Corner Bookshelf: Utilizes corner space, an excellent option for smaller rooms.
Materials Needed
Once you’ve decided on a design, it’s time to gather your materials. Depending on your chosen style, your list might vary, but here’s a generalized list of materials for a basic bookshelf:
- Wood (Plywood, MDF, or solid wood)
- Wood screws
- Wood glue
- Finishing nails
- Paint or varnish
- Sandpaper
- Measuring tape
- Level
- Drill
- Screwdriver
- Saw (circular or jigsaw)
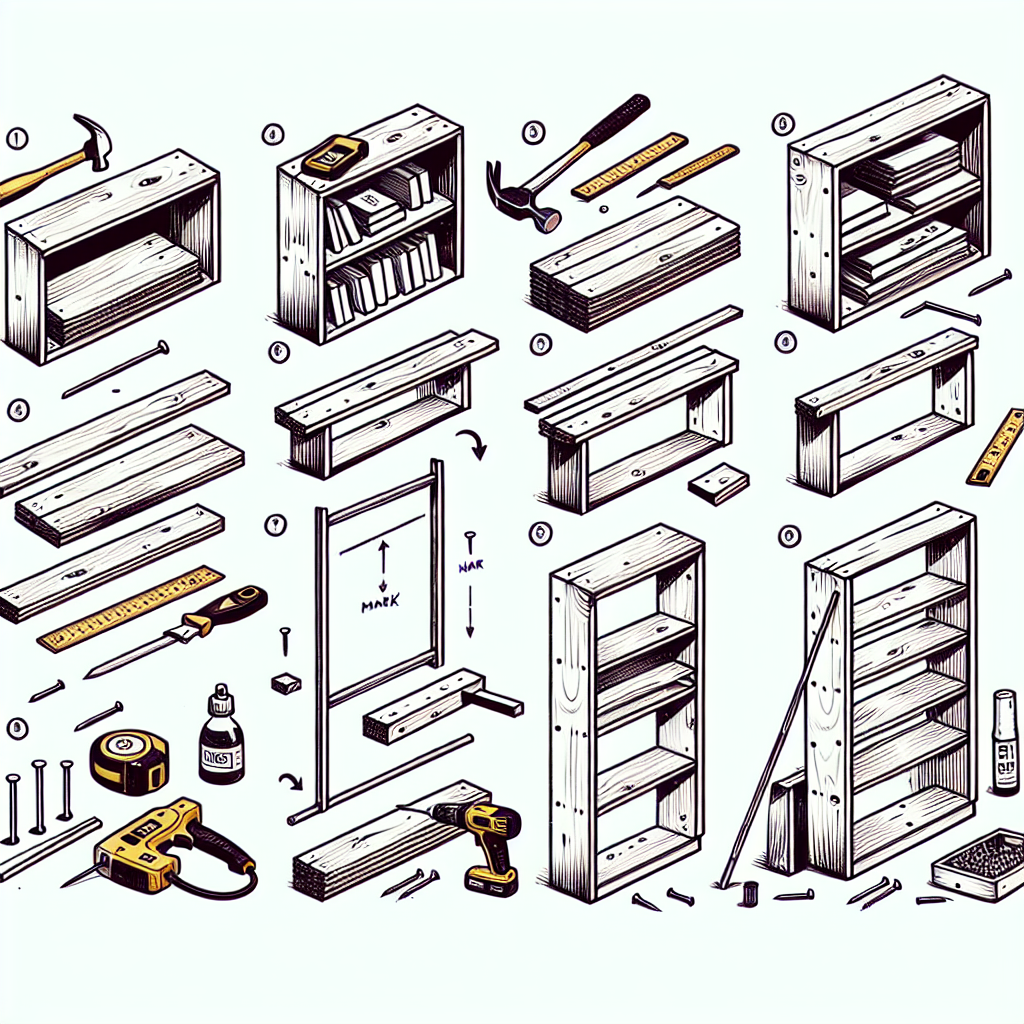
Measuring and Planning
The next step in how to make a bookshelf is to accurately measure the space where your bookshelf will go. This ensures that your finished product will fit the designated area.
- Use a measuring tape to determine the height, width, and depth of the space.
- Consider the size of your books and what additional items you might want to store.
- Sketch your design, paying attention to the number of shelves and their spacing.
Cutting the Wood
With your materials gathered and your design in mind, it’s time to cut your wood. Accurate cuts will lead to a sturdier and more professional-looking end product.
“Measure twice, cut once.”
This famous saying holds true in woodworking and emphasizes the importance of precision. Use your saw to cut the pieces according to your measurements:
- Main shelves (typically the longest pieces)
- Side supports (the vertical pieces that hold up the shelves)
- Top and bottom pieces (to provide structure)
Assembling the Bookshelf
After cutting your wood to size, it’s time to assemble your bookshelf. Following your earlier design will make this step easier:
- Attach the side supports to the bottom piece using wood glue and screws for extra stability.
- Attach the top piece in the same manner.
- Use a level to ensure that everything is square and aligned.
- Insert shelves at your desired heights, either by using pre-drilled holes or brackets.
Finishing Touches
Once your bookshelf is assembled and sturdy, it's time for the finishing touches. This step significantly impacts the aesthetic of your bookshelf, so take your time.
- Sanding: Use sandpaper to smooth out rough edges and surfaces.
- Staining or Painting: Apply your choice of wood stain or paint. Be sure to use a protective coat if you opt for paint.
- Sealing: Finish with a varnish or clear coat for durability and shine.
Styling Your Bookshelf
Now that you have the perfect bookshelf, it’s time to style it! Not only is it a place for books, but it can also showcase personal items and decor. Here’s how to effectively style your bookshelf:
- Arrange books both vertically and horizontally to create visual interest.
- Incorporate decorative elements like plants, candles, or artwork.
- Use baskets or boxes to hide clutter while maintaining an organized look.
- Keep the color palette cohesive for a clean, harmonious appearance.
Common Mistakes to Avoid
Even experienced DIYers can make errors during the process of building a bookshelf. Here are some common mistakes and how to avoid them:
- Not Measuring Properly: Always double-check measurements before cutting.
- Neglecting to Sand: Skipping sandpaper can result in a rough finish that detracts from the overall look.
- Poor Stacking of Books: Ensure heavier books are placed at the bottom for stability.
Final Thoughts
Making your own bookshelf can be a rewarding project that enhances not only your home decor but also your practical storage solutions. By following these steps and tips, you will have a custom piece of furniture that suits your unique style and needs. Remember that creativity plays a significant role when learning how to make a bookshelf. Feel free to adapt your design to your preferences, and enjoy the process!
Share Your Experience
Do you have any tips or experiences related to building your own bookshelf? We’d love to hear about it! Share your stories in the comments below, and let’s inspire each other to create beautiful spaces filled with books!
```By Guest, Published on August 4th, 2024