How to make taper candles
Introduction
Candles have been a primary source of light and ambiance for centuries. Among the plethora of candle styles available, taper candles are renowned for their elegant and classic design. Whether used in formal dining settings, cozy home environments, or special events, taper candles add a warm touch that enhances any atmosphere. If you’ve ever wondered how to make taper candles, you’re in the right place. This article will guide you through the entire process, from choosing materials to finishing touches.
Understanding Taper Candles
Before diving into the crafting process, it's essential to understand what taper candles are. Typically, taper candles are long, cylindrical candles that are designed to fit into candle holders. They have a narrow base that tapers to a narrower top. Traditionally, they're about 10 to 12 inches in height, making them perfect for formal dining occasions.
Why Make Your Own Taper Candles?
Creating your own taper candles offers several benefits. Not only do they provide a personalized touch to your home decor, but they can also be customized in color, scent, and size. Furthermore, crafting candles can be a rewarding and creative outlet that allows you to experiment with different waxes and techniques.
Materials Needed
To get started, you’ll need a collection of materials. Here’s a comprehensive list:
- Candle Wax: Paraffin, beeswax, or soy wax.
- Candle Molds: Taper candle molds (metal or silicone).
- Wicks: Cotton or wood wicks, appropriately sized for your candle’s diameter.
- Color Dyes: Candle dyes to add colors to your candles.
- Scent Oils: Optional, for adding fragrance.
- Double Boiler: For melting wax without burning it.
- Thermometer: To monitor wax temperature.
- Stirring Spoon: For mixing wax and additives.
- Pouring Pitcher: To safely pour the melted wax into molds.
- Newspaper or Drop Cloth: For protecting surfaces from wax spills.
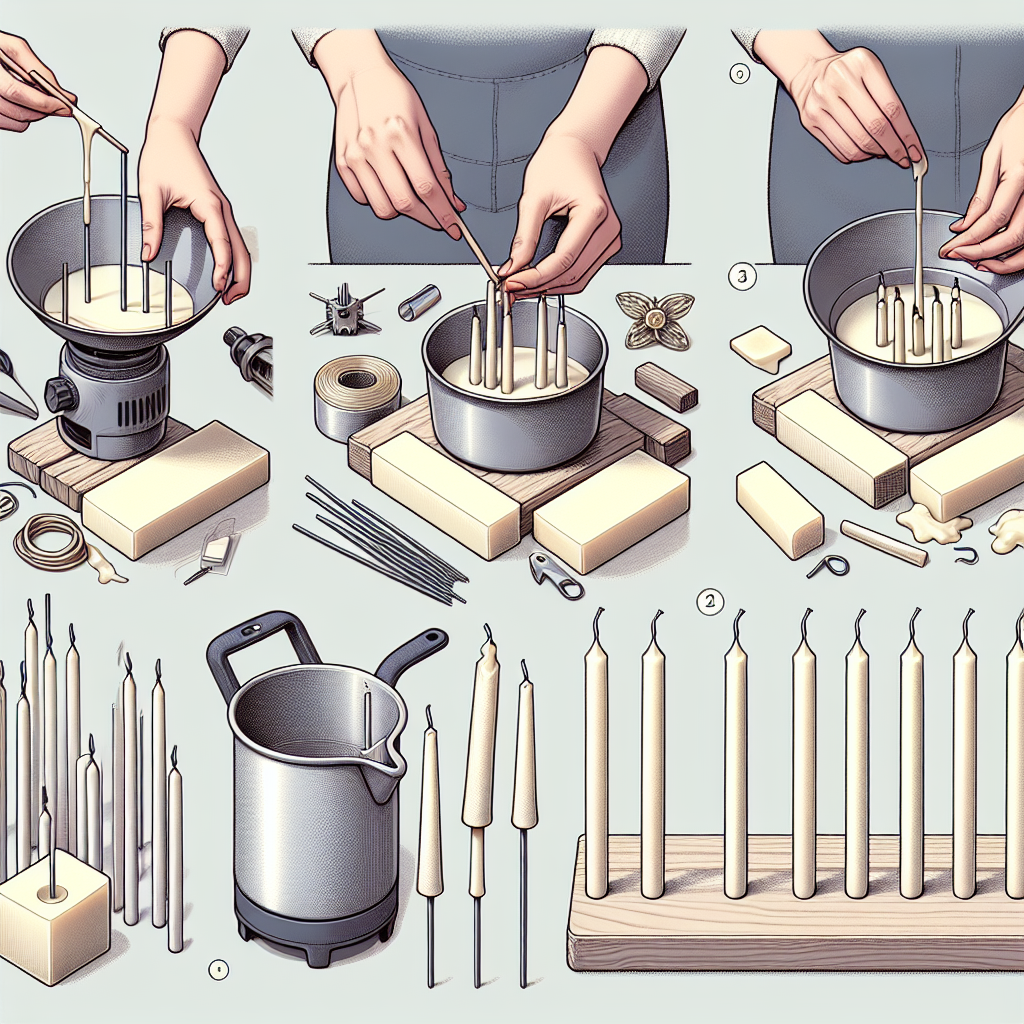
Step-by-Step Guide on How to Make Taper Candles
Step 1: Prepare Your Workspace
The first step in the process is to set up your workspace. Make sure you’re in a well-ventilated area and cover surfaces that might get wax on them. Lay down newspaper or a drop cloth to catch any spills or drips.
Step 2: Melt the Wax
Next, you’ll need to melt your chosen wax. Using a double boiler, fill the bottom pot with water and bring it to a simmer. Place your wax in the top pot and monitor its temperature with a thermometer. Usually, the wax should reach about 170 to 180 degrees Fahrenheit for optimal pouring.
Step 3: Add Color and Scent
Once your wax is melted, it’s time to add color and scent. If you’re using color dyes, mix them into the wax thoroughly until you achieve the desired color. For scent, typically 1 ounce of fragrance oil per pound of wax is recommended. Stir well to ensure an even mixture.
Step 4: Prepare Your Molds
Before pouring the wax, prepare your molds. If you’re using metal molds, make sure they are clean and dry. If you're using silicone molds, priming them with a light spray of non-stick cooking spray is a good idea to help with the release later.
Step 5: Insert the Wick
While your wax is still at a suitable temperature, take your wick and dip the bottom into the melted wax. This will help the wick adhere to the bottom of the mold. Allow it to cool for a moment. Then, place the wick centrally into the mold, ensuring it stands straight. Pinch or tie the wick at the top to keep it in place during the pouring.
Step 6: Pour the Wax
With the wick secured, carefully pour the melted wax into the mold, leaving some space at the top if desired. The wax can be poured in slowly to avoid air bubbles. Allow the wax to settle in the molds for about 15 minutes. If necessary, top off the wax as it may shrink during cooling.
Step 7: Cooling and Unmolding
After the candles have cooled for several hours (or overnight), it’s time to unmold them. Depending on your mold type, either carefully peel away the mold or gently tap the sides of the mold to release the candle. Be gentle; you don’t want to break the taper candles!
Step 8: Trimming the Wick and Finishing Touches
The final step is to trim the wick to about 1/4 inch above the surface of the candle. This ensures a good burn and reduces soot. If desired, you can buff the candles with a soft cloth to give them a nice shine.
Tips for Creating Perfect Taper Candles
- Choose Quality Materials: High-quality wax, wicks, and dyes result in better candles.
- Experiment with Scents: Don't hesitate to mix fragrance oils to create unique scents.
- Practice Makes Perfect: Each batch you make will help hone your skills.
- Keep Temperature Consistent: Ensure your wax is at the right temperature for pouring and setting to avoid defects.
- Use a Wick Holder: For more stability, especially for taller candles.
Creative Ideas for Custom Taper Candles
After you've mastered how to make taper candles, you may want to explore some creative variations:
- Color Layers: Create layers of different colors by allowing each layer to set slightly before adding the next.
- Embedded Decorations: Place dried flowers or herbs in the wax before it sets for added character.
- Unique Holders: Create or upcycle interesting candle holders to display your beautiful taper candles.
Safety Considerations
When making candles, safety is paramount. Here are a few tips to keep in mind:
- Always work in a well-ventilated area.
- Wear gloves to protect your hands from hot wax.
- Never leave heating wax unattended to avoid fire hazards.
- Keep flammable materials away from your workspace.
- Be cautious with dyes and fragrance oils, as they can be intoxicating in high concentrations.
Conclusion
Making your own taper candles is not just a fun DIY project; it’s a great way to personalize your space or even give thoughtful gifts. Armed with the knowledge of how to make taper candles and the right materials, you can create beautiful pieces that add warmth and elegance to any occasion. Happy crafting!
By Guest, Published on August 22nd, 2024