How to make squishies
Discovering the Joy of Crafting: How to Make Squishies
In recent years, squishies have taken the crafting world by storm. They not only provide hours of fun during the creation process but also serve as stress relief and decorative items. If you’re looking to dive into this delightful DIY project, you’ve come to the right place. In this guide, we will explore the materials, steps, and tips for making your very own squishies at home.
What Are Squishies?
Squishies are soft, foam-like toys that can be squeezed and manipulated, often resembling various characters, food items, and objects. These delightful little creations are popular among children and adults alike, whether for play, decoration, or therapeutic purposes. Their appeal lies in their satisfying texture and the calming sensation they provide when squeezed.
Materials Needed to Make Squishies
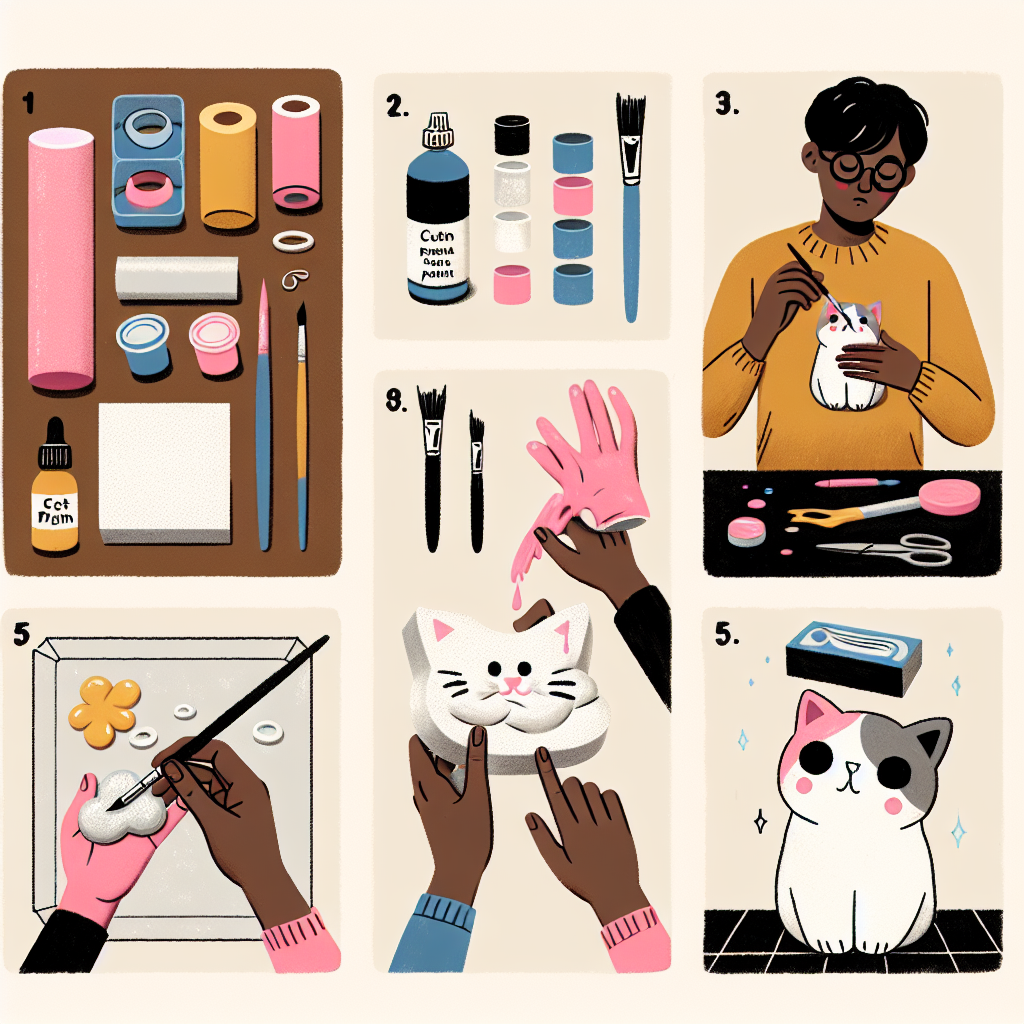
Before we delve into the crafting process, let’s gather the necessary materials. Below is a comprehensive list that will prepare you for your squishy-making adventure:
- Foam Material: This can be memory foam, kitchen sponges, or special squishy foam.
- Shape Molds: These can be silicone molds or self-made templates.
- Paint: Fabric paint works best for coloring your squishies.
- Paint Brushes: Use these for applying colors with precision.
- Sealants: A clear sealant will protect your paint and enhance durability.
- Tools: Scissors, a mixing bowl, and a craft knife may be needed.
- Optional Decorations: Glitter, rhinestones, or stickers can enhance your squishies.
Choosing the Right Foam
Your choice of foam is crucial, as it determines the squishiness and durability of your final product. Here are some popular options:
- Memory Foam: Known for its softness and slow rise. Ideal for detailed designs.
- Kitchen Sponges: Readily available and can be cut to different shapes.
- Squishy Foam: Specifically manufactured for crafting squishies with a variety of textures.
A Step-by-Step Guide on How to Make Squishies
Step 1: Create Your Mold
To start, you’ll need to create a mold in which to shape your squishy. This can be done through either of the following methods:
- Using Silicone Molds: Purchase pre-made silicone molds shaped like your desired squishy design.
- Making Your Own Templates: Draw your desired shape on paper, cut it out, and use it as a guide when cutting your foam.
Step 2: Cut the Foam
Once you have your mold ready, it’s time to cut your foam accordingly. Ensure you take safety precautions while using scissors or a craft knife:
- Carefully trace around your mold or template onto the foam.
- Cut the foam with precision, ensuring the edges are smooth for a clean look.
Step 3: Painting Your Squishy
Next, it’s time to express your artistic flair by painting your squishy. Here are some tips to achieve the best results:
- Use fabric paint for vivid colors that won’t crack.
- Apply multiple layers of paint to achieve depth, allowing each layer to dry before adding the next.
- Consider mixing colors for unique effects.
Step 4: Adding Details
After painting, embellish your squishy with details. This can include:
- Drawing facial features with a fine brush
- Adding glitter or rhinestones for sparkle
- Using stickers for quick designs
Step 5: Seal Your Creation
To ensure your artwork lasts, apply a clear sealant. Here’s how:
- Choose a non-toxic clear coat suitable for the material of your squishy.
- Apply it in a well-ventilated area for safety.
- Allow time for the sealant to cure properly before using your squishy.
Tips for Successful Squishy Making
For the best results, consider the following tips:
- Practice Patience: Allow each layer of paint and sealant to dry completely to prevent smudging.
- Experiment: Don’t be afraid to try new designs or color combinations!
- Start Simple: If you’re a beginner, start with basic shapes before moving on to intricate designs.
Personalizing Your Squishies
One of the exciting aspects of creating squishies is the opportunity to personalize them. Here are some ideas to make your squishies stand out:
- Choose a theme, such as cartoon characters, animals, or favorite foods.
- Incorporate your favorite colors or patterns for a unique touch.
- Involve family or friends in crafting sessions for added fun and creativity.
Storing and Caring for Your Squishies
To maintain the quality and longevity of your newly crafted squishies, follow these care tips:
- Store them in a cool, dry place to prevent damage.
- Keep away from direct sunlight to avoid fading.
- Clean them gently with a damp cloth as needed, avoiding harsh chemicals.
Conclusion: The Squishy Satisfaction
Crafting squishies is a fulfilling and enjoyable experience that can be shared across generations. Whether you're making them as a stress-relief tool, unique gifts, or just for fun, the process is vastly rewarding. Follow this guide to successfully learn how to make squishies that reflect your personality and creativity. Happy crafting!
“Creativity is intelligence having fun.” - Albert Einstein
By Guest, Published on September 28th, 2024